Frequently Asked Questions (FAQ)
What does it mean when I get a "service access denied" message?
The short code is blocked from all short codes. In general, Sprint and T-Mobile tend to automatically block short code messaging for their customers. A few years ago, there used to be ‘premium short codes' that allowed companies to charge consumers when they texted a word to a short code. Many businesses were abusing this system and many consumers would unknowingly purchase products such as wallpapers, ringtones, etc. Subsequently, Sprint and T-Mobile decided to block short code messaging. This blocking is not 100 percent guaranteed, as many phone numbers are able to receive short code messages without having to initially remove the block.
Does Trumpia provide a list of phone numbers that we can add to my list?
No, Trumpia has a strict opt-in subscription policy. The contact information you upload must come from your own customer database. In other words, only people who have voluntarily opted in may be a part of your distribution lists.
How do I create a Facebook sign-up page?
Go to Collect Contacts then Create A New Online Sign-Up Page.
Check the box for Facebook Sign-Up Page and complete all required fields.
Please note: In order to create a Facebook sign-up page, you must first have your Facebook account(s) connected to your Trumpia account. You can link your accounts by clicking on My Account and going to Social Networking Accounts.
What is the disclosure field in the keyword creation process?
In compliance with MMA regulations, when an individual opts in to a distribution list, the advertiser must provide an estimate of how many messages an individual will receive in a given month. It is your responsibility to ensure that you are fully compliant, so please be sure to check all relevant industry and carrier regulations.
This will not prevent you to send messages above this threshold value.
The subscriber will receive a text notification:
"Welcome! Msg data rates may apply. Get X# msg/mo. Reply HELP for help. STOP to Optout."
This will not prevent you to send messages above this threshold value.
The subscriber will receive a text notification:
"Welcome! Msg data rates may apply. Get X# msg/mo. Reply HELP for help. STOP to Optout."
How do I build my database?
There are two general approaches to building your contact list.
Internet
Mobile Keywords
Internet
- - Online Sign-Up Page (OSP)
- - Embedded Sign-Up Page (eOSP)
- - Facebook Widget
Mobile Keywords
- - Normal Type
- - Mobile Voting Type
- - Shuffle Responder Type
Why is my mobile keyword not working?
In creating a mobile keyword, the very last step would be selecting the frequency at which the auto-response message is sent to the contact after he/she texts the keyword to the short code. There are three options in this step.
- a. Only once per mobile number: If a number is already on the distribution list attached to this keyword, they will not receive the auto-response message.
- b. Only once every hour, day, week, month, or year: A customer can receive the auto-response message once every hour, day, week, month, or year, depending on which one you choose. For example, if you select every hour and a customer texts the keyword twice within one hour, that person will receive the auto-response message only once.
- c. Every time: No matter how many times a customer texts the keyword, the auto-response message will be sent every time.
Why are two messages sent out when my customer texts the keyword, and can I remove the "REPLY STOP to opt-out" instruction?
When someone texts a keyword for the first time, two messages are sent: the "Welcome standard data rates may apply" message and the auto-response message that you created. The first message is required by MMA guidelines and our contract with our supported phone carriers. Because this message is required, it will not cost you any text credits. The "REPLY STOP to opt-out" instruction is required by law and therefore must appear on every message.
It is your responsibility to ensure that you are fully compliant, so please be sure to check all relevant industry and carrier regulations.
It is your responsibility to ensure that you are fully compliant, so please be sure to check all relevant industry and carrier regulations.
How do I download the CSV file and check for failed contacts using the imported contact list?
To download the CSV file and check the failed contacts:
- 1. On the navigation bar, click on Collect then Add/Import Contacts.
- 2. Scroll down to the Import Contacts section.
- 3. Click on Import History on the bottom right hand side of the page.
- 4. This will open your Import History page, click on the file name you choose to download until it highlights blue.
- 5. Click on View Report.
- 6. Next, click on Download Discarded Records.
How do I import contacts?
To turn on the ability to import contacts, a form needs to be submitted to us. You can complete this form electronically, but the signature must be handwritten.
To access this form:
To access this form:
- 1. On the navigation bar, click on Collect then Add/Import Contacts.
- 2. Next, choose which type of messages you are sending to your contacts:
- a. Solicitation for marketing and promotional messages.
- b. Non-solicitation for alerts, notifications, and internal communications.
- 3. Click on Request on the bottom right.
- 4. Next, click on Print Certification on the bottom right.
- 5. This will open an Import Certification window.
- 6. Complete the certification.
- 7. Scroll down to the very bottom of the page and click Print.
- 1. On the navigation bar, click on Collect then Add/Import Contacts.
- 2. Next, choose which type of messages you are sending to your contacts.
- 3. Click on Request on the bottom right.
- 4. Click on Upload Certification.
- 5. On Select File(s) to Upload, you can attach the completed and signed form.
- 6. Click on Submit.
How do I edit the keyword compliance message? What parts can I edit?
You cannot edit the keyword compliance message. This is a standardized templated message. However you can make three minor changes:
To make edits to these fields, please refer to the following:
- 1. Monthly Messages Frequency
- 2. Description of the Messages
- 3. The contact number
To make edits to these fields, please refer to the following:
- 1. Hover over Manage then click Contact Database
- 2. When you are on the Contact Database page, click on the Create button at the top left of the page.
- 3. A window will pop up, prompting you to fill out the following fields:
- a. Distributions List: Name the list to your liking. It's for your own reference.
- b. Display Name: You can also name this to your liking. The only time a customer will see the Display Name is when you create an Online-Signup Page for this list.
- c. Monthly Message Frequency: This is how many messages the customer will receive per month when signing up for this list.
- d. List Description: This is the type of message they will receive when signing up for this list. Example: Promotions or Alerts or Offers, etc.
- 4. Click Save and that's how you create a distributions list.
- 5. To edit the contact number in the compliance message you must edit the contact number in your organizational profile. You can do this by hovering over the Account tab and by selecting Edit Organizational Profile.
How do I edit a keyword?
To edit keyword settings, please follow the proceeding steps.
If you want to edit the actual keyword, you will have to delete it then recreate it.
- 1. Log into your account.
- 2. Select Collect from the top gray navigation bar.
- 3. Select the appropriate keyword and highlight it blue.
- 4. Select the Edit button.
If you want to edit the actual keyword, you will have to delete it then recreate it.
How do I format the Excel file for imports?
After completing the import certification, you will be able to import contacts using an Excel spreadsheet. First, please make sure the contact information is in the correct format. The first row will be the name of the column itself (i.e., "First Name", "Email", etc.). All subsequent rows will be a contact that you are wanting to import (i.e., Row 2 would be "John Smith", his email, mobile number, etc.), followed by the next contact, and so on.
 *Note: Please ensure that the mobile numbers do not have any special characters and spaces within the numbers. Only the 10-digit number is accepted.
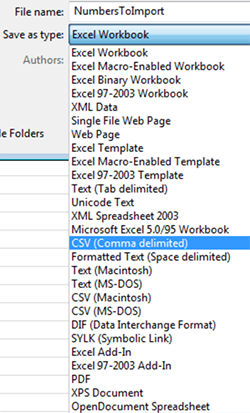
Once the file is formatted, click Save As, and under Save As Type, choose CSV (comma delimited) format.
 Upload the contacts by going to Collect then Add/Import Contacts. Scroll down to Import Contacts and select the Distribution Lists then click Import.
Once the file is formatted, click Save As, and under Save As Type, choose CSV (comma delimited) format.
How do subscribers opt in after opting out?
A subscriber will be removed and blocked from a short code when they text STOP. Subscribers have two options to opt in again and remove the block. These options can be found under Collect > Keyword and Online Sign-up Tools.
- 1. Mobile Keywords - a keyword can be created that allows subscribers to text to join a list. On the page Keyword and Online Sign-up Tools, scroll down to Mobile Keyword List and click the drop-down menu (please select a keyword type), select Keyword Signup.
- 2. Online Signup Pages - a web form that can collect subscriber information. On the page Keyword and Online Sign-up Tools, scroll down to Online Signup Pages and click Create.
What is the difference between an eOSP and a hosted URL?
We have a variety of online sign-up pages.
- • A hosted sign-up page is available directly on a webpage that is provided by us. You will not need to have your own website or developer in order to use one of these, as you can create one directly from your account and have it available without further work.
- • An embedded online sign-up page can be placed on any website that supports HTML and iFrame. You can include (embed) a snippet of HTML code on a webpage somewhere on your website, and users can sign up directly from your website without having to go to another website. You will not need to create the code, but you will need to edit it on your webpage in order to include this eOSP in your webpage.
How do I get more information after opting in?
You can get more information after opting in by simply replying "help" to the short code you initially texted the keyword to.
Why does my phone number show up when people text my keyword? How do I change it?
By our Terms & Conditions, a number needs to be added to the compliance message. You can change the number that appears by doing the following:
- 1. Hover over Account > Account Settings.
- 2. Click on the Organizational Profile tab.
- 3. Click on Edit Profile found on the bottom right hand in that section.
- 4. Edit the Contact Number to the number you want to use for the compliance message.
- 5. Click on Save found on the bottom right hand corner.